Usage Instructions
Shortcut bar

Process Flow
Test images pack download link: https://github.com/nachifur/MulimgViewer/files/10948418/test_img.zip
Note: This software does not support automatic refresh, after modifying the layout parameters, you need to refresh manually (Ctrl+R).

Fill in the layout parameters in the Settings panel:
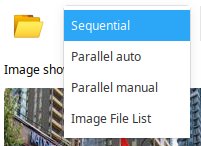
Row(number of images in a row),NumPerImg(number of sub-images that will be combined into a single image),Col(number of images in a column).File->Open, select input mode:
2.1. Sequential: Multiple images in one folder. (
test_input/01)2.2. Parallel Auto: One folder with several subfolders, each subfolder contains multiple images. (
test_input/)2.3. Parallel Manual: Manually select multiple folders. (
test_input//01+test_input//02)2.4. Image File List: Import images according to a given list of filenames (TXT, CSV). (Demo file)
Open the folder and import the path.
After loading the images you can use the Next and Previous buttons to switch between them.
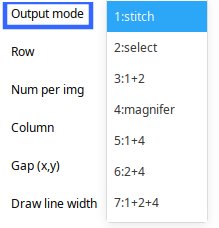
Input/OutPut->OutputMode, select the output modeFile->Select output path, Select the output path.Save 💾️
Keyboard shortcuts
Input path:
Sequential: Ctrl+E
Parallel Auto: Ctrl+A
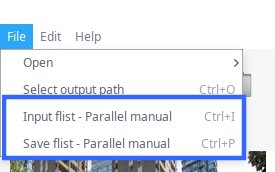
Parallel Manual: Ctrl+M
Image File List: Ctrl+F
Output path: Ctrl+O
Next: Ctrl+N
Previous Ctrl+L
Save: Ctrl+S
Refresh: Ctrl+R (Or right mouse button)
Hide toolbar: Ctrl+H
Use the keyboard arrow keys (up, down, left, right) to move the image in the image panel.
Functionality description
Input mode
Sequential is a serial browsing mode. It is used to display and stitch multiple images with different filenames contained in a single folder.
Parallel Auto and Parallel Manual are parallel browsing modes (subfolders with different names). In order to compare the images, each folder or subfolder must contain the images with the same filenames.
Image File List is a custom mode. You can import a list of images from TXT or CSV file. CSV supports multi-line and multi-column mode.
For automatic image arrangement set NumPerImg to -1.
Output mode
stitch: Save the stitched image to the stitch_images directory.
select: Save the currently displaying images to a different folder. By default the images will be copied to a new location, you can select MoveFile to move them instead.
magnifer: Save all the magnified areas separately.
Automatic image arrangement
By default NumPerImg = -1 and this is an automatic layout mode. NumPerImg means that several images are combined into a single image.
If NumPerImg = 1 or >1, then the image layout is in manual mode. In this mode Row and Col numbers can be adjusted.
Sequential browsing in a parallel mode
By selecting Parallel+Sequential option, you can simultaneously view the first n images in folders 1-12, n can be set by NumPerImg.
Parallel+Sequential:
For example: Row=5, NumPerImg=4, Col=1 means that MulimgViewer will show 4 images from 5 parallel directories at once, 20 images in total. Check Vertical to change the image layout direction.

Parallel->Sequential: Generate a image list containing all pictures in multiple folders, and then display them in serial.
In Parallel+Sequential mode, the file name under each subfolder needs to be the same, but in Parallel->Sequential mode, it is not required.
Auto save
Select AutoSaveAll, then click Save 💾️.
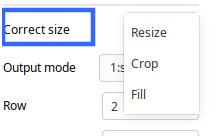
Image size normalization
Fill: Image size is the largest image in a group, filling mode (keep the original pixel resolution).
Crop: Image size is the smallest image in a group, cropping mode (keep the original pixel resolution).
Resize: Image size is an average size of all the images in a group, scaling mode (don’t keep the original pixel resolution).
Gap between images

Color fill
You can use custom background and foreground colors and transparency.
Parallel Manual mode supports file list import and export
Independent display and output sizes
This feature provides independent view and output scales.
Application scenario:
When you need to display a lot of images at the same time and the screen can’t fit them all, just set
Scale:Showto shrink the images.Stitched images at 100% scale can be very large, but you can control the dimensions of the individual images by setting
Scale:Out.
Parallel zoom
Process Flow:
Click
Zoom 🔍️

Mouse pointer will be turned into a crosshair cursor. Now you can make a selection;
To make a selection press and hold the left mouse button, drag mouse to draw a rectangle and then release the button — a magnified area will be displayed;
Click the right mouse button to duplicate the selection.
Tip:
🔍️KeepSize— keep the image and the magnified area aspect ratios the same.🔍️Scaleby default is set to-1,1, which means the scaling factor will be chosen automatically.Select
Vertical, then pressCrtl+Rto place the magnified area on the right side of the original image.Use
🔍️Scaleto change the magnification factor, but keep in mind that the maximum size will not exceed the original image size. For example,3,3means enlargement by a scale factor of 3.Box:Widthis set to2,3. The line width in the original image is 2, and the line width in the magnified image is 3.Set
Box:Widthto0,0to hide the selection border.Box:Widthis set in pixels and remains the same in all zoom levels. If the selection border width is suitable whenScale:showis set to0.1,0.1andScale:Outis set to1,1, then it will probably be much thinner in the output image.After clicking
Zoom 🔍️, select the image by clicking the image with the left mouse button, and then usectrl+ mouse wheel to zoom the image globally.The scroll wheel zoom function is controlled by a zoom factor. Every time you manually set
Scale:Showto1,1, the zoom factor is cleared to zero.
Adjust the position of the selection:
Note: After selecting SelectBox option you cannot make a new selection by pressing the left mouse button, but you can still duplicate an existing selection by pressing the right mouse button.
Check
SelectBoxPosition the mouse pointer inside the selection border and click the left mouse button to select it;
Use the keyboard arrow keys to adjust the position of the selection; PS: press
shiftto change the speed or use the right mouse button to quickly move the position of box.Uncheck
SelectBox.
Clear a box:
Method 1:
Check
SelectBox, click the left mouse button on a selection, pressDelto clear the chosen selection;Uncheck
SelectBox, pressDelto clear all selections.
Method 2:
Uncheck
SelectBoxDouble-click the left mouse button on the image
Press
Ctrl+Rto clear all the selections and refresh the view
Manually change the color of the zoom box.
Check
SelectBoxCheck
Box:SelectBoxOn the original image, select a box with left click
Left click Color/transparency:Draw and select the color
Do not show box/img
Uncheck
Box:InBox, remove the box on the original pictureUncheck
Box:In🔍️, remove the box on the enlarged pictureUncheck
ShowImg, the original picture will not be displayed
Uncheck Show🔍️, the enlarged picture will not be displayed
Automatic window size adjustment
Enable AutoWinSize for automatic window resizing.
Browse images, precise positioning
Move the slider for coarse positioning.
Help->Index tableFind the serial number of the image;
Enter the serial number and press Enter.
Title
Title
After closing
Title:Auto, you can customize the display titleIn the
Sequentialinput mode, the file name is01_DSC.jpg, and thePrefixandSuffixare not selected, the file is displayed asDSC. Use numbers to sort image files.
Font
It is recommended to use the installation version
_Setup.exeCopy the font
1_Calibri-Light.ttfto the installation directoryC:\Program Files (x86)\MulimgViewer\font\usingThe smaller the number in
1_Calibri-Light.ttf, the higher the font order in the GUI
Important information and useful tips
Parallel mode
Make sure that image filenames in all folders/subfolders are the same when using the multi-image modes (Parallel Manual and Parallel Auto).
Subfolder naming is also important. If the names are 0,1,2…10,11, then you should change them to 00,01,02…10,11. Otherwise MulimgViewer will sort them as 0,1,10,11,2…
Recommended file renaming tool:
win10: uTools
Ubuntu:
purrr.
sudo apt install purrr
Thunar - Bulk Rename Files.
sudo apt install thunar
find /path/to/folder -type f > ./filelist.txt
Multi-image stitching, high resolution images, window size issues
Disable
AutoWinSizeand maximize the window.Adjust
Scale:Showas needed. For example,0.2,0.2to shrink,2,2to enlarge images.Set
TruthResolutionto resize all the images to the same size for your viewing convenience.